Showing posts with label repurposing. Show all posts

Sunday, July 31, 2011

Thrifting in the Mountains! With Jake!

We went on a little vaca in the mountains two weeks ago. My husband was working so I was flying solo with my 15 year old, Jake, and his friend Patrick. The boys golfed every day so I had lots of time to read and relax, not a bad deal.

I did not even have thrifting on the brain but saw a sign that the local Lions Club were having a big garage sale on the Saturday morning. Jake asked if I thought they would have any golf clubs. He hadn't played since the summer before and we hadn't realized he had outgrown his junior set. We were in Fairmont Hot Springs, BC and the place is a mecca for golf (the resort we were at had three courses alone, plus countless others within a short drive). Seriously, if anywhere was to have golf clubs it was there.

So my son got up with me bright and early while Patrick slept and we hit the sale. Within minutes Jake worked out a deal with one of the volunteers for a set of clubs for $10. TEN DOLLARS!! For an entire set of clubs including a great bag with a stand. He was pretty pleased with himself. I guess the apple doesn't fall far from the tree ;). Here's a shot from the iPhone.


And I managed to find something myself for $10. This glass and iron shelving unit. I knew this thing had promise.


But it didn't *quite* fit into my Honda Civic (especially with the third bag of golf clubs!). But I was determined to bring it home and for the entire 3 hour highway drive it stayed securely up top thanks to the 100 feet of rope I picked up at the hardware store and the Mexican blanket I always keep in my trunk, along with some strategic rope tying.


The boys thought I was NUTS. I suppose I am. But look at how this thing prettied up with a can of Krylon Fusion Hammered Finish spray paint.


It was absolutely worth the time it took to mount it to my roof and the stressful drive home worrying if it was staying secure. And the fact that the drivers behind me left lots and lots of room was A-OKAY too. Kidding. I tied that sucker so tight it didn't even BUDGE.

Thanks for visting! I'm linking up to Rhoda's Thrifty Treasures party and Linda's Nifty Thrifty Tuesdays.


Tuesday, December 21, 2010

Ikea Furniture Redo & Nook Makeover

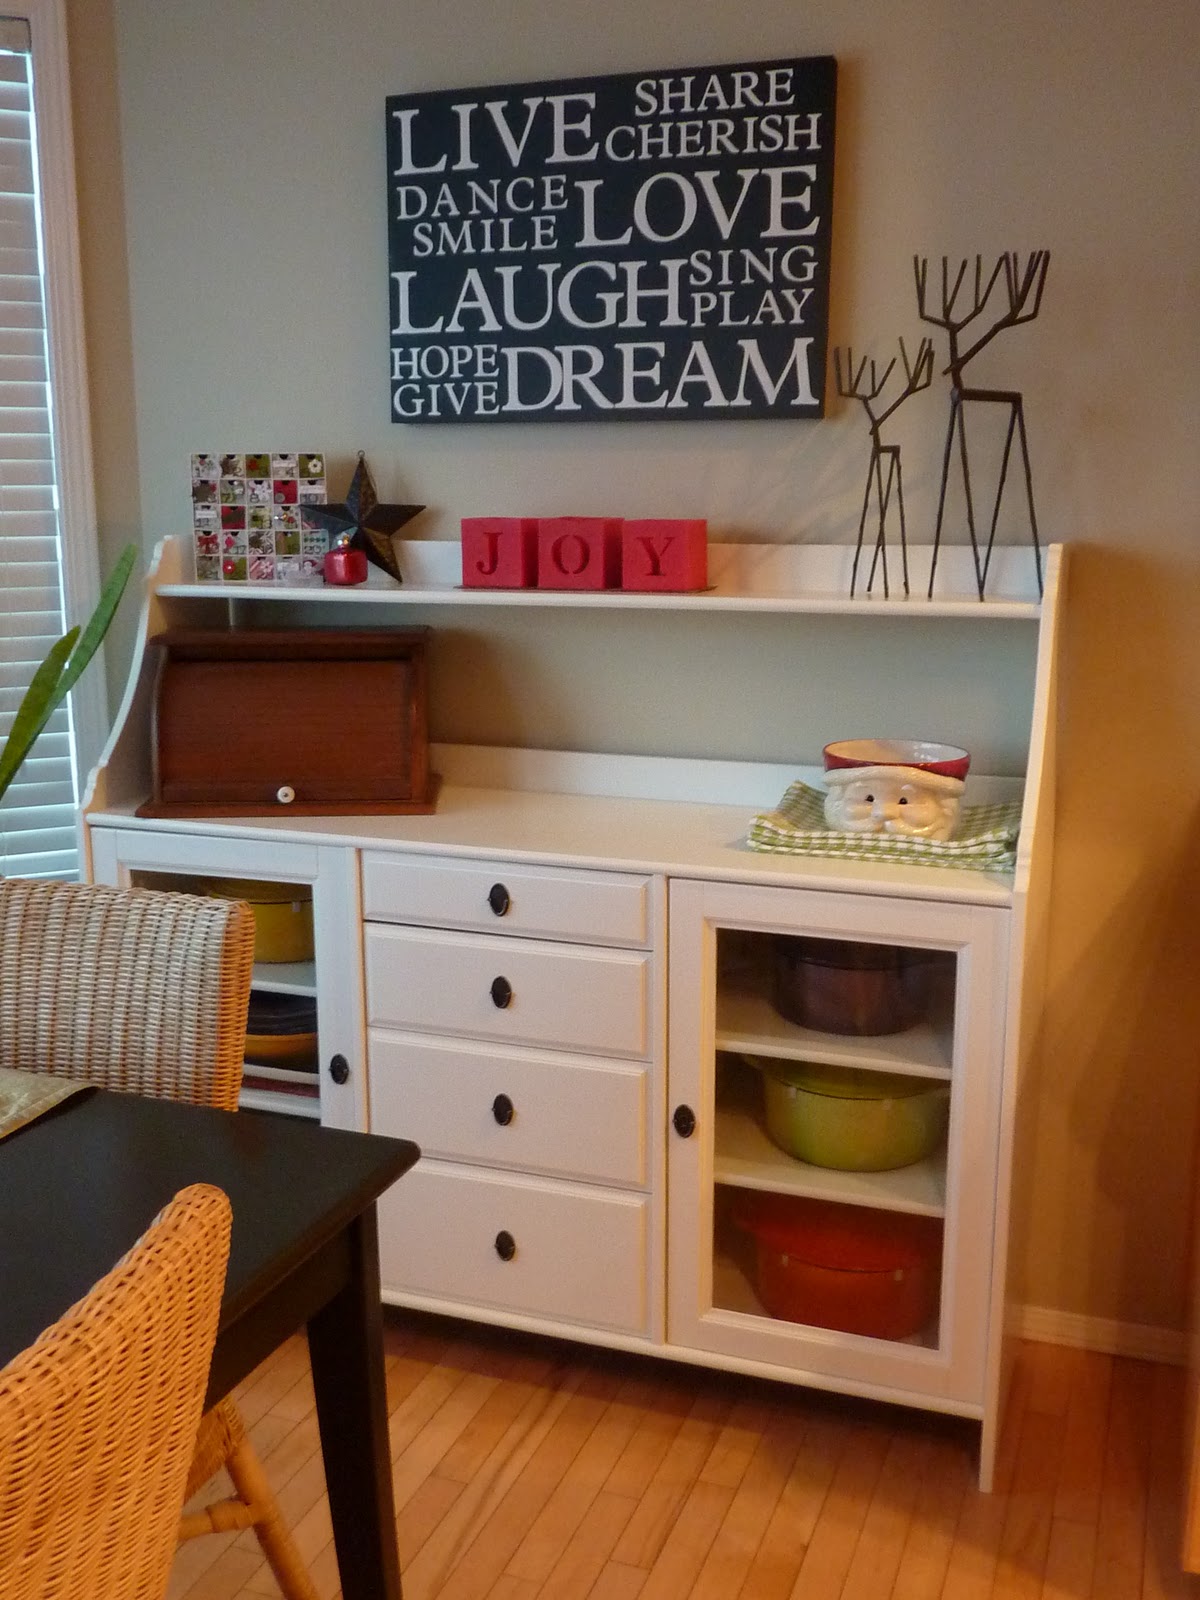
Our kitchen table and buffet are from Ikea. When I purchased this furniture I thought it would do for a few years until I could get what I really wanted. We were in a new house and what I really wanted at that time was something that matched and was affordable. It is from the Leksvik line and is pine. The table was less than $200 and the buffet was only $99 as I purchased at a damaged box sale. Despite the banged up box it ended up being just fine. The nook has looked like this for many years:


I've never *loved* this furniture (nor has hubby, he hates Ikea) but replacing it has never been a priority. Over the years it has served us fine and I like the glass doors and display shelves. When my friend and fellow thrifter Charlene first suggested I paint the buffet I was totally opposed and didn't think it would be worth the effort. Over time the idea grew on me. I had hung the subway art sign in the nook and really liked the black and white in there. I decided to go for it and started with the table. Although sanding away years of kids handwriting from homework sessions at the kitchen table was a little sad, I was really happy with the end result.


I took a couple days break after finishing the table before starting on the buffet, which took much longer due to the doors, drawers, and shelves. I started the buffet about 2 weeks ago and was happy to see furniture being painted white all over blogland. The only white furniture we have in our house is in my craft room and after priming it was looking REALLY white and I was nervous. I used Pittsburgh Paint Cookie Crumb which is quite creamy, while still 'white' if that makes any sense. I thought about distressing the edges but wanted a modern look despite the shape of the piece. In it's original state it always seemed really traditional looking. I think it is much more transitional in white.


Anyways, I finally finished a little over a week ago and got it back into place. It was *not* love at first sight and I freaked a bit wondering if I had made a big mistake. However, after decorating it and putting my beloved french ovens back in place, I was(and remain)totally SMITTEN. It feels like we got new furniture.


My husband hung a new drum pendant to complete the nook makeover. I debated changing out the chairs but I think their neutral colour balances out the black and white against our maple kitchen. When I look at the before pics I can't believe what a difference painting made. I'm still not sure this set is what I want long term, but I think we'll get at least a few more years out of it yet :)

Although I finished this more than a week ago I'm linking to Primitive & Proper's Piece of Work Wednesday (I didn't get a chance last week). I cannot tell you how helpful Cassie's prepping and priming advice was. The last piece of furniture I painted was my son's baby dresser when I was pregnant (he turned 15 on Sunday!) so was VERY rusty. But trust me, if I can paint furniture ANYONE can.


Another valuable resource was this post on Young House Love.

Thanks so much for peeking and if I've managed to hold the attention of my crafty pals to this point I hope this explains my lack of posting things of a crafty sort lately!

Sunday, July 4, 2010

Vintage Pyrex and Funky Fruit Bowl


With my thrifty-pal-garage-sale-partner in crime Char out of town for the long weekend I decided not to go garage sale-n this weekend. Instead, I stayed home in my craft room and made several cards. It felt great to spend hours in there.

Anyways, as I don't have any *new* thrifty finds to share this week I thought I would show my Pyrex collection to date and a thrifty little project I did this weekend.


I started collecting vintage Pyrex in late May and have been lucky enough to find quite a few pieces between garage sales and thrift stores. I am not sure where I will ultimately display them, but for now they are stacked on the buffet, close at hand so I can use them. I love serving food in the colourful bowls and have used a few items in the oven as well. It's a fun and inexpensive thing to collect. The orange Pyrex are my very favourite.


Onto my little project...I had a birthday recently and was spoiled by my family and friends. I have to share one of my gifts with you. When I lifted the tissue paper look what I found...


Isn't that just a bag of happiness? OF COURSE, it's from my super-wonderful-fantabulous friend Char (you're the best!) and because I am not one to wait to use new things I got busy right away. You may have seen this bowl in my garage sale finds last weekend.


It was a tough decision what colour to go with but I decided on this...


Now, that's a pop of colour in our otherwise very neutral kitchen nook!! I just love it.

Thanks for visiting me today. I'll be linking this up to Rhoda's Thrifty Treasures and Debbie's Garage Salen party

ETA: also hooking up to Sarah's before and after party on Thrifty Decor Chick!


Sunday, June 27, 2010

Vintage Letterpress Tray...and more!


It's been a few weeks since I have been out garage sale-ing but Char and I were back in action this weekend. We headed out early Saturday Morning and hit a community sale. At our very first stop I found this vintage letterpress tray. A few months ago I wouldn't have even know what this was, but after I saw how my friend Carly is using hers I have been wanting one. These can sell upwards of $100 on Etsy so I was really pleased to find one at a garage sale for $5!


I would rate the condition as fair and very, very dirty. I spent close to 4 hours cleaning it but could probably work on it for days. My husband (who is not the world's most patient man) suggested I use his power washer on it. Ha! My efforts did improve it slightly as you can see by the photo below (taken after the first third had been cleaned).


The tray has paper backing which was impossible difficult to clean. In an effort to protect my stamps I decided to insert card stock over the paper backing and behind each of the stamps. I'll stamp the image first and it will also serve to remind me where the stamp belongs. A glue dot was used to keep the card stock in place.


And here it is in a corner of my craft room. As you can see, I don't have many wood mounted stamps but now that I have a place to to put them I am thinking there may be more in my future ;). There are lots of small openings which work great for my ink cubes. Now that I have the tray up I've decided to keep my notice boards in my craft room and will be hanging them shortly beside the tray.


Other great finds of the day were two lamp shades in perfect condition for $1 each.


I thought I might cover them but they actually work well in our family room as is.


I almost passed on these charger plates. At $10 they seemed expensive until I realized there were 12 of them, and many still had original price tags of $4 each on the bottom. They will be nice with our Christmas table setting which is orange, cream, and gold.


The other items are a new black Ikea floating shelf which retails for $20 and was bought for $5, a wire fruit bowl bought for $2, two books that were 50 cent each, and a new set of rubber alpha stamps that I picked up for $2.


So there's my haul for the day. Not bad for $27, hey? Not to mention I had a great day with a super friend.

I'll be linking this up to Southern Hospitality.


Sunday, June 20, 2010

Thrifty Notice Boards


This weekend I finally got around to completing a project I have been meaning to do for ages. I picked up these two frames last summer at a garage sale for $5. I knew I wanted to do a blackboard in one of them but wasn't sure about the other. I decided on a cork board and cut the cork out of a cheap board I picked up on clearance for $2.88. With the chalk board paint the project cost about $12 for both notice boards.

Before:


During:


I did spray the chalkboard paint right on the glass using several light coats. I realize these DIY blackboards are getting to be old news by now but I'm happy to have finally made one!

After:


Not sure where these will go yet. I originally thought my craft room but perhaps our hall off the garage would be better. We got a new stainless (aka non-magnetic) refrigerator this winter and I miss having a surface to put up important notices. As we exit the house thru the garage that might be a good place to put up reminders...or chore lists for my guys (ha ha).

Oh, and check out this cute vintage canning jar I'm using for chalk. It has a glass lid and was another garage sale find.


Thanks for visiting! I'm linking up to Rhoda's party on Southern Hospitality.

Friday, June 11, 2010

Porch Makeover


Hiya! I'll warn ya, this is a long one. You might want to just scan the pictures :).

One of the features of our pretty basic SPEC house I love is our front porch. It is covered, west facing, wood (the norm in these new areas is precast concrete), and a decent size to sit out and enjoy the evening sun on. The only thing is we've rarely sat out there in the seven years we've been here as our furniture was really uncomfortable. The little bistro set below was originally purchased for a balcony in a condo we had before the house. Pretty? Yes. Functional? Not so much.

Before:


A couple of weeks ago I decided to spruce up the porch and had almost talked myself into two new resin wicker Adirondack-type chairs from Home Outfitters. I had a 25% off coupon for one item but the pair would still end up costing $175, plus a side table and accessories. I just couldn't justify it. But then I remembered we have 6 chairs in our set on the back deck, and rarely have 6 people around the table.

After:
(Do you see my dog in the window wondering what I am doing outside without her??)


I can't tell you how pleased I was to re-purpose something we already owned. AND I pretty much ended up with the "look" I was after. Now, I did spend some $$$, TOO MUCH $$$, actually. I suppose my instant-gratification-need beat out my thrifty-sensibilities!

I purchased the side table and outdoor cushions. (I originally put out regular cushions but they stained slightly after the first rain). The good news is I was able to use that 25% off coupon on one of the cushions. I also purchased the candle and hurricane on clearance at Winners.


Two of the four planters on the steps we already had, the other two I picked up for 50 cents each at a garage sale last weekend. I filled one of the 50 cent pots with some fresh herbs, do you see the markers? So easy to do and I like them better than the plastic tags that come with the plants. I made some for my herbs on the back deck too..quick and easy with my little alpha stamps.


The wire planter is a new addition, I picked that up at a garage sale a couple of weekends ago for $3. I found the coconut liner at our local garden centre.


Finally, I added WELCOME to our front door. I cut the vinyl out with my Cricut. I'm still getting used to it and think the letters might be a bit too big, so this could change.


So, there you have our front porch re-do! Not including the plants/flowers, I spent approx $100. I think I could have done it less expensively if I had found the table and cushions at a garage sale or thrift shop. But I am pleased that I did pick up most of the accessories on the cheap and used some things we had on hand, namely the chairs. It's not a dramatic difference, but it is more casual and reflective of our style. And when we do have 6 people around the table on the back deck, we can easily "borrow" these chairs from out front.


Thanks so much for visiting! I'll be linking this up to Monday's Thrifty Treasures on Southern Hospitality.

Thursday, June 3, 2010

Planter Redo


Hi there!

We don't have a lot of privacy on our deck and I thought adding greenery rather than flowers this year might help with this. There are some gorgeous, contemporary looking planters in the stores this spring but I remembered some metal planters we had from a few years back. They were once a vibrant blue but became very badly sun faded.

And so began my first adventure with spray painting. I say first because it was so easy and I loved the results. I will be doing this again soon.

Before:


In less time than it took to drive to the store to buy the spray paint I had all three of these planters looking fresh and matching our deck decor. I planted palms in two of them and saved one for flowers, which I hope to add soon. The effect was as desired as the plants do provide a bit of privacy when we are sitting at the table. The best part is that I resisted retail and used something we already owned.

After:


This last pic is of the deck (and our dog). I've since added my $5 market umbrella.


Thanks for visiting. I'm hooking this up to House of Hepworths. There are some really amazing projects over there this week.

ETA: I am also linking up to Thrifty Decor Chick's Before and After party.